|
|
|
|
A few weeks ago, I was browsing www.xbox-scene.com, and I read a few topics regarding the possibility of using an external hard drive with the xbox. These discussions eventually ended up as a tutorial at http://www.xbox-scene.com/articles/externhdd.php. The tutorial basically shows you how to extend the xbox IDE and power cables outside the xbox, enabling you to quickly change the hard drive that the xbox boots with. This was a great idea, and I must give credit to Efini for setting my mind in motion, but I wanted something more. As I thought about what I wanted, a few requirements came to mind... a)
I wanted to be able to switch between multiple (3) hard drives without
plugging and unplugging. The
largest hard drive capacity supported by the xbox is 137GB (or more specifically
137,438,953,472 bytes, which also happens to be 2^28) This limitation
is enforced by the fact that the xbox IDE chipset uses 28 bit LBA (logical
block addressing). Although Maxtor and a few other companies have recently
released a new standard which utilizes 48 bit LBA, the LBA bitdepth used
is a function of the CHIPSET, and Unfortunately, 137GB is all the xbox
will ever support. No future BIOS update can change this fact. But as
this project illustrates, there is a way of moving beyond the 137GB barrier
on the xbox. Another thing to note is that there are no 137GB drives.
If a drive larger than 137GB is used on a controller that only supports
28 bit LBA, the total drive size will be cut off at 137GB. For the purposes
of this project, I will ultimately use three Maxtor 160GB drives. Each
one will be cut off at 137GB, giving me a total of approximately 411GB!
Aloha, my name is John. I am from USA and I enjoy using the internet. Check out some of the beautiful websites I've came across over the years.
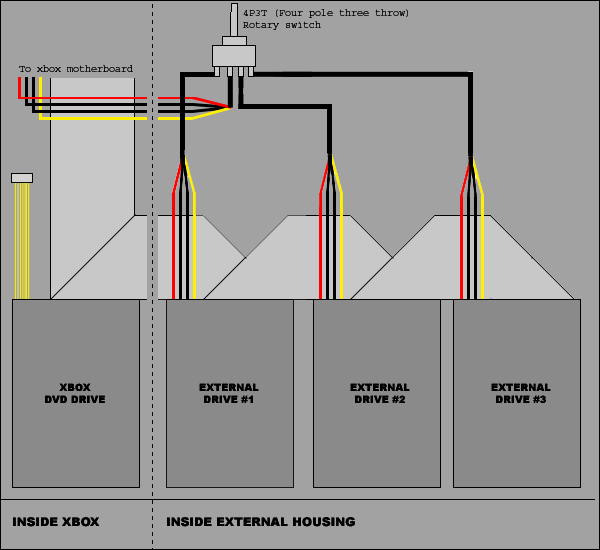
My first breakthrough came about when I found the Romtec Trios Drive Selector. The Trios is a device with the dimensions of a standard PC CD-ROM drive that allows you to select one of three IDE drives by pushing a button on the front panel of the Trios before booting the PC. I thought this might be a good foundation for my project, so I stopped by my local Fry's Electronics to pick one up. The Trios usually retails for $79.99, but Fry's had it on sale for $49.99. On that same trip to Fry's, I also picked up the enclosure that I would ultimately use for "Project 411GB" , but I'll get to that in a bit. The Trios did work with the xbox, allowing me to select one of three drives connected to it, but there was a big problem! It took the Trios a good twenty seconds to mount the drive each time the xbox was turned on or even reset. In other words, I would turn the xbox on, the 'blob' animation would play, then there would be a black screen for a full twenty seconds, and THEN the evox dashboard would load. At first, the twenty second pause did not seem so bad, but after a while this got very annoying! I knew there had to be a simpler way, so I took the Trios back to Fry's. I experimented some more, and then realized an amazing fact! Although an IDE channel can only support two devices, you can have more than two devices on a single IDE cable, as long as only two are powered up at the same time! This meant that I could have the xbox DVD drive, as well as three (or more) hard drives, all on the same IDE cable, and could choose which drive booted by simply diverting power to the proper drive. A
schematic displaying how this works can be seen below...
|
||
|
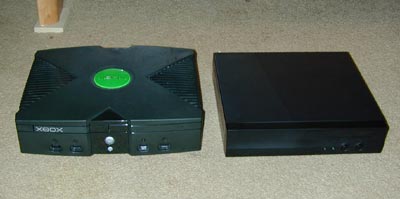
Now that I had the basic design worked out, it was time to start working on the enclosure... The enclosure I selected is the Cubid 2677R mini-itx case. This is a very small case specifically designed for the new mini-itx motherboard standard being pushed by VIA. Although the case was meant to house a small PC, it works out perfectly to house three (and perhaps more?) hard drives. As you can see, the size shape and color are almost identical to the xbox. The Cubid 2677R is about and inch shorter and an inch deeper than the xbox. These typically retail for around $80, but Fry's currently has then on sale for $59.99. If you do get one, make sure you get the model with the single cardslot on the rear. Other options for an external case include a standard SCSI external housing, but as these are typically more expensive than the $59.99 I paid, not to mention that aesthetically, they don't measure up, I think the Cubid is a good choice. If you have a empty xbox case laying about, this might work as well.
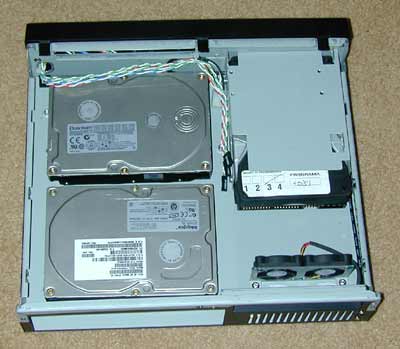
The interior of the case is pretty straightforward. On the left is a mounting for a single 3.5" hard drive. On the right is a mounting for a slim optical drive. Actually, if you are wondering, the Cubid does not have an internal power supply! A small external laptop style power supply plugs into a jack on the rear. This 12V input then plugs into a small DC -> DC convertor board (located under the slim optical drive) which splits the voltage into 5V and 12V. A standard ATX motherboard power plug, as well as a single Molex type power connector are supplied by this convertor board.
With the optical drive mount and DC -> DC convertor board out of the way, it was time to figure out how to mount the drives inside the case.
By placing the three drives inside the enclosure, I found it to be a perfect fit. The two extra drives could sit side by side and still allow adequate room for IDE and power cables. The standoffs on the bottom surface of the case made it impossible to securely lay the drives flat on the bottom of the case, so I managed to find a couple of single drive mounts at my local electronics surplus store.
Not wanting to drill holes through the bottom of my case just yet, I happened on the idea of securing the mounts to the bottom of the case by use of double sided foam tape. I was a little concerned with this, as the tape would not allow the metal to metal contact between the drive and the case that would facilitate better heat dispassion. The tape holds the drive in very tight, and I have not had problems with heat, but as I further perfect this design, I just might create a mounting system that features full metal to metal contact. |
||
|
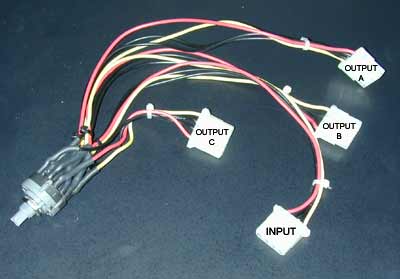
With the positioning and mounting of the drives finished, it was time to figure out how to divert power to one drive at a time. As you can see in the schematic diagram above, doing this requires a 4P3T (four pole, triple throw) switch. What this means is that the switch takes four wires (poles) as an input, and diverts the current to one of three sets (throws) of four wires.
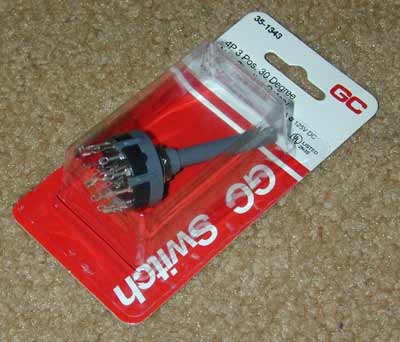
I found such a switch at Fry's. At another surplus store, I had actually found a special switch called a gang switch. This type of switch behaves exactly like an old fashioned radio switch. Buttons are aligned horizontally, and when one is pressed, the others pop out. I considered using it, but mounting it would have been a much larger headache than mounting the rotary switch which simply requires a single round hole.
The three position switch has a total of 16 pins on its underside. Four pins for the input wires, and four for each of the three outputs. The four pins grouped in the center are the input pins. To determine which wire I needed to solder where, I used a multimeter to test continuity between pins in each of the three switch positions.
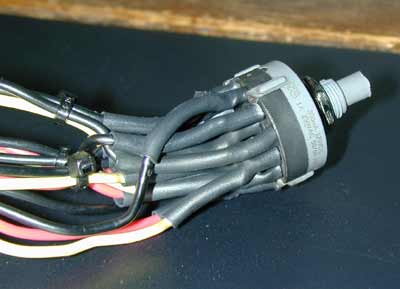
When all was said and done, I had a wire soldered to each of the 16 pins. I also cut the shaft down to size to accommodate how far it would protrude from the front of the case.
As you can see, the resulting 'wiring harness' allows for diverting the input current to one of the three hard drives at a time.
I drilled a hole in the front of the case for the rotary switch, and added a small knob that I found at Radio shack.
|
||
|
With the switch installed, it was time to connect the drives together with an IDE cable. Since I was going to connect more than two drives, not to mention the fact that I wanted as little excess cable as possible, I decided to build my own custom cables.
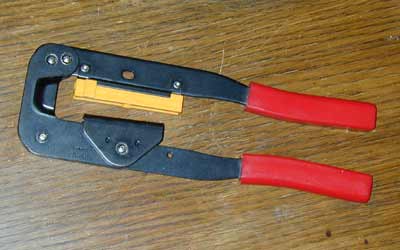
This is an IDC crimper. IDC stands for "Insulation Displacement Connector", so called because the electrical connections are made by actually displacing (scraping away) the insulation on the cable. When the connector is pressed onto the cable, each of the 40 wires of the IDE cable is pinched by a claw shaped pin.
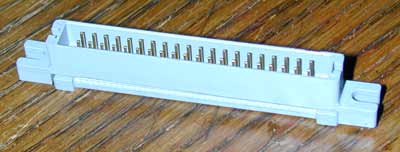
In order to facilitate the easy separation of the xbox and external enclosure, I needed to have an IDE header on both the enclosure and the xbox. Here is a closeup of a male IDC connector. The mounting holes make it easy to mount this connector to the outside of the case.
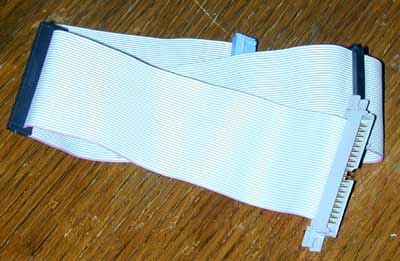
Here is the finished IDE cable for the enclosure. On one end is the male IDC connector which will poke out of the rear of the enclosure, and three separate female IDC connectors will connect to the three hard drives.
Because I made my own cable, I was able to precisely control the position of each connector. When folded, the cable sits very neatly in the enclosure.
|
||
|
The next thing to do was to mount the power connector to the back of the case. After a lot of trial and error, I found it impractical to mount a standard Molex power connector to the rear of the case. I actually tried several options, but in the end needed something that would mount to the external surface of the case as well as have connectors large enough to conduct the 2+ Amps the drive would draw on spinup.
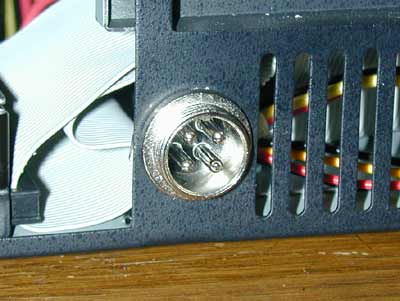
In the end, I wound up using a standard 4 pin microphone jack from Radio Shack. This type of connector is commonly used with CB radios, but works well for this application. I had wanted to use a male 9-pin D-Sub connector, but I did not want to take the chance of sending 2 Amps through those tiny pins. The pins on the microphone jack are just about the same size as the pins on a standard Molex connector, so excess power would not be a concern.
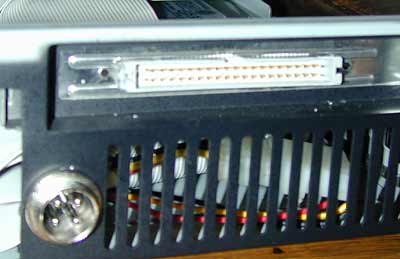
Here is a view of the connectors mounted on the rear of the enclosure. A screw will go into each hole on either side of the male IDE connector to hold it securely in place.
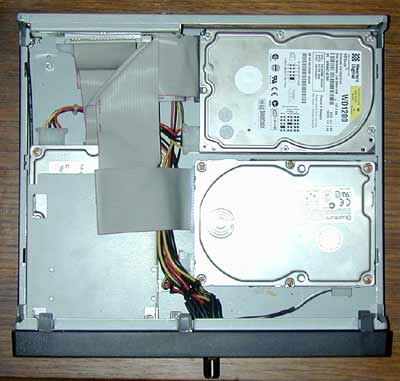
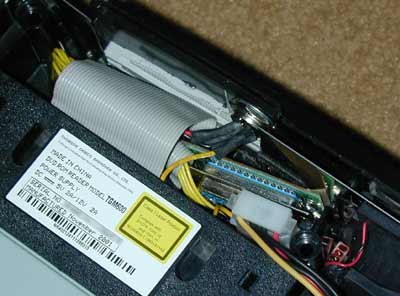
I went through the same process with the xbox, creating the custom IDE cable, and mounting the male IDE connector and power connector to the rear of the xbox.
Although it is a bit cramped, it all fits inside. I had to mount the openxbox at an angle to make room for the wires attached to the external power connector. The openxbox has protective tape on all sides to avoid having it short against any other part inside the xbox. I also used velcro to help keep the openxbox in place.
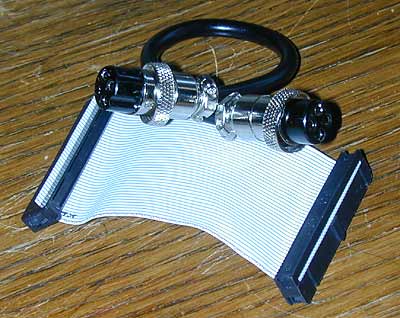
With male IDE and power connectors now installed on the enclosure and xbox, it was time to create two patch cables to connect the two together. Above is a round cable with two female microphone connectors on each end, as well as a short IDE cable with a female connector on each end.
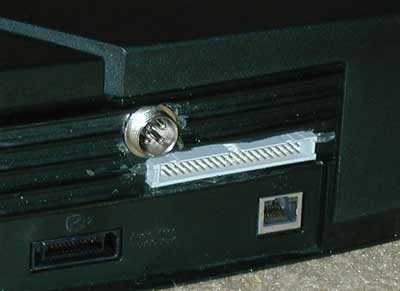
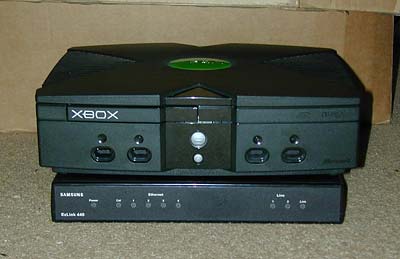
Here is a shot of the xbox sitting on top of the enclosure while connected. The power cable has a knurled ring on each end which twists closed to form a very secure connection. I made the IDE patch cable just long enough to allow easy access to the ethernet jack I plan on leaving the rear ATX panel open to allow for better cooling.
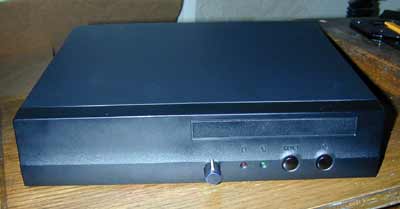
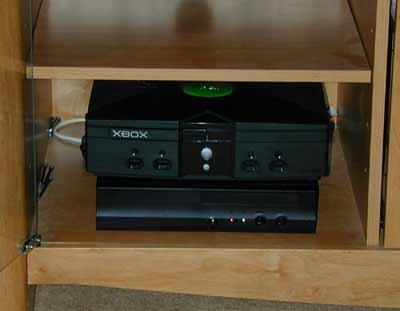
Here is the finished product sitting nicely in my entertainment center.
|
||
|
09-26-02 UPDATE!!!
I have recently obtained a small number of small black cases that are a perfect match for the XBOX. The width and depth are very close to the dimensions of the XBOX, and the height is 1.5 inches...just enough room for three drives and adequate ventilation. It also has a nice set of LEDs which I plan to use for power, drive selected, drive access, and perhaps network indicators as well. I am currently thinking about the idea of putting a kit together with all parts necessary to build this project, Including the case, all cables, hardware and the rotary switch. Please drop me a line if you would be interested in this idea.
|
||
|
All in all, I am very pleased with the results. At the current time, I have one 120GB drive and one 80GB drive installed for a total of 200GB. In the number three position, I have my original xbox hard drive, so I can boot 'original', if I ever want to. In the near future, I plan on obtaining three 160GB drives, to bring the total to 411GB. One thing I have noticed is that the length of the IDE cable is critical: the shorter the better. I found that the drive on the farthest connector was giving me 'dirty disc' errors during sustained loads on certain games. The drives on the number one and number two connectors worked flawlessly. To remedy this, I took up some of the slack I conservatively left in both of the IDE cables. Originally, to make the cables lie flat and neat in the enclosure, I had to make the cables longer than they otherwise might have been (there is more than 12" between drive two and drive three) I have now reduced the total cable length, and everything is working fine. One last thing I'd like to change is the external connectors. I wanted to use female connectors for everything that was mounted to the external case to avoid the possibility shorts and bent pins, but so far, I haven't found panel mountable female IDE or power connectors. If I do find them I'll make the change to my project and update this page. If you have any questions or suggestions, please feel free to drop me a line at ferrellcat@hotmail.com |
||
Hi! I am Angel and welcome to my website. I created this blog as a task with CabalArticles, --an ESL and Website Development course. If you want to contact me, fill up the contact form available on this website. Below is my Resume, along with some samples of online sites and web content I've composed intended for CabalArticles.
Qualifications
Graduated Magna Cum Laude from ECS
10 years of content creation experience (specifically intended for Internet based viewers)
7 years of website creation experience.
Competent, goal-oriented worker with a taste for details.
Work Experience.
CabalArticles,2004 - Present
Managing Director
In control of setting up a international crew of writers to accommodate a specialized list of growth goals and objectives.
- Set new records for production, raising production by 18% around the world
- Accurately managed regular logs of task distribution
- Supervised QA for global development over a sizable staff of internet writers
Self Employed Wordpress Website Designer
2009-Present
Additional Abilities
Proficient in Spanish
Superior knowledge using a huge choice of office software
Samples of Writing